Build and Boot AGL Instrument Cluster demo image (IC-IVI with Container isolation)
This document describe how to build AGL instrument cluster with container integration.
1. Select Image type and target board
AGL IC container integration has various type. Developer need to choice which integration type. Those type show in table1.
Table 1. Integration type.
| No. | Type name | Detail of type | Required storage (SD card) size - board. | Build time AMD R9 5900HX /64GByte RAM | Required storage size-build. | |
|---|---|---|---|---|---|---|
| 1 | Simple container host | This integration aim to core package definition for container host using LXC. This integration is not include demo package. This integration aim to define starting point for downstream product development. | 1G Byte | 150GByte | Console only. | |
| 2a | Instrument cluster with simple demo IVI install to one partition. | This integration aim to get most simple integration with demo feature. This container runtime and management is constructed with LXC package only. On the other hand, it has limitation for supported use case. This integration support two demo guest run in one board (instrument cluster guest and momi IVI guest). This integration aim to learn drm lease and LXC container by developer. | 2GByte | 2h | 300GByte | 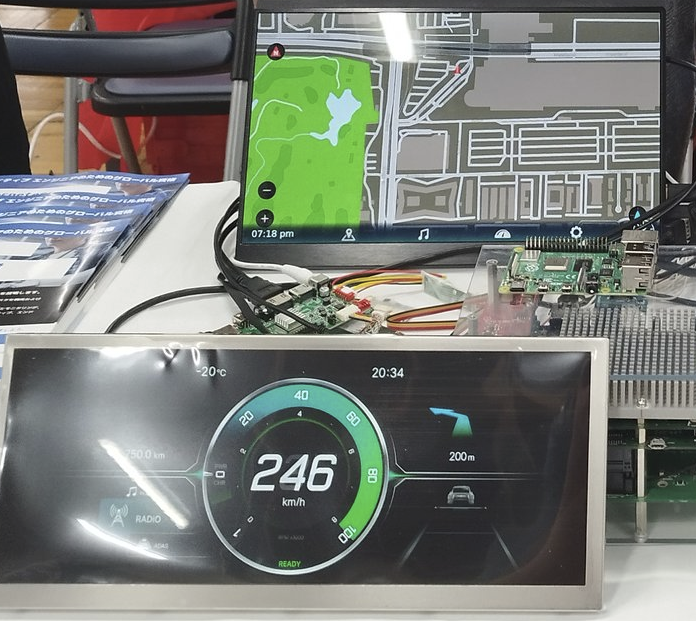 |
| 3a | Instrument cluster with demo IVI install to one by one partition. | This integration aim to get simple integration with demo feature. This container runtime and management is constructed with container management daemon with liblxc. This integration will improve to support many embedded use case. This integration support two demo guest run in one board (instrument cluster guest and momi IVI guest). This integration aim to learn and develop AGL IC container integration by developer. | 16GByte (Including pre-allocated partition for 3 guests.) | 2h | 300GByte | |
| 3b | Instrument cluster with four demo IVI install to one by one partition. | This integration aim to get full demo integration with AGL demo IVI. This integration is extend from 3a integration. This integration support instrument cluster guest and four IVI guest (momi, qt, flutter, html5). This integration aim to use AGL demonstration in each event by developer. | 16GByte | 3a+6h | 600GByte |  |
We recommend to choice 3a. It can extend to 3b.
AGL IC container integration supported two board. Those board show in table2.
Table2. Supported board.
| Board type | Support integration type | status |
|---|---|---|
| AGL RefHW | 1,2a,3a,3b | Tested |
| R-CarH3 Starter Kit with Kingfisher board | 1,2a,3a,3b | Not tested. |
| R-CarM3 Starter Kit with Kingfisher board | 1,2a,3a,3b | EOL Board. Not tested. |
| R-CarH3 Starter Kit | 1,2a | End of Supported in latest release. |
| R-CarM3 Starter Kit | 1,2a | EOL Board. End of support in latest release. |
| Raspberry Pi4 (4G or 8G) | 1,2a,3a,3b | Tested. |
We recommend to choice AGL RefHW or Raspberry Pi4 (4G or 8G).
**Typical Hardware Set is shown in Appendix.1. **
2. Setup build environment
Build environment for AGL IC container integration is same as AGL other profile build environment.
1st step:
Please read [Build Process Overview] in AGL doc.
2nd step:
Please read [Preparing Your Build Host] in AGL doc.
3rd step:
Define Your Top-Level Directory.
$ export AGL_TOP=$HOME/AGL
$ mkdir -p $AGL_TOP
4th step: Download the repo Tool and Set Permissions
If your environment already install google repo, please skip this step.
$ mkdir -p $HOME/bin
$ export PATH=$HOME/bin:$PATH
$ curl https://storage.googleapis.com/git-repo-downloads/repo > $HOME/bin/repo
$ chmod a+x $HOME/bin/repo
5th step: Setup git
If your environment already setup user information for git, please skip this step.
$ git config \--global user.email "you@example.com"
$ git config \--global user.name "Your Name"
6th step: Download the AGL Source Files
$ cd $AGL_TOP
$ mkdir master
$ export AGL_TOP=$HOME/AGL/master
$ cd $AGL_TOP
$ repo init -u https://gerrit.automotivelinux.org/gerrit/AGL/AGL-repo
$ repo sync
7th step: Downloading Proprietary Drivers (AGL RefHW and R-Car H3/M3 with Kingfisher board only procedure)
If your board is Raspberry Pi4, please skip this step.
7-1: Downloading Proprietary Drivers from Renesas-automotive-products.
In case of Optimistic Octopus and master, please download this.
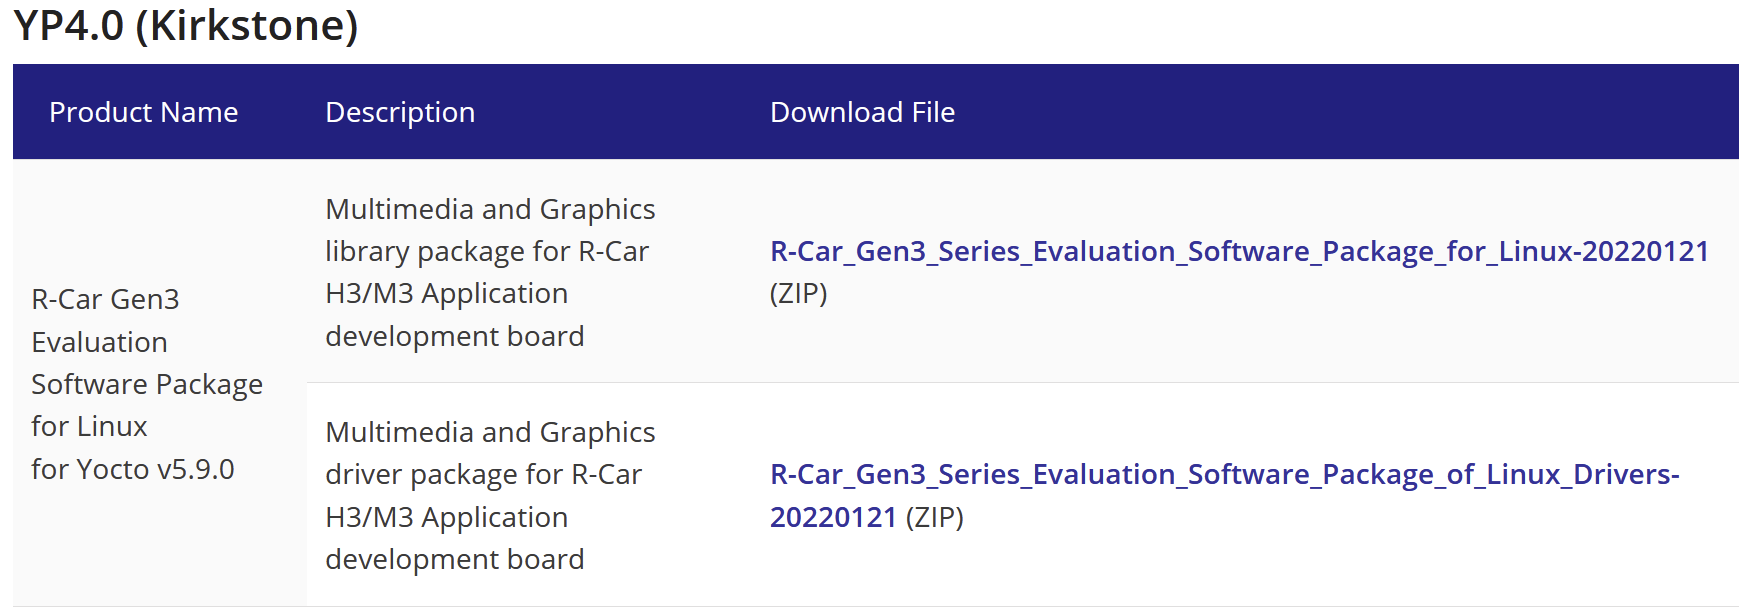
7-2: To check the files to download.
$ grep -rn ZIP_.= $AGL_TOP/meta-agl/meta-agl-bsp/meta-rcar-gen3/scripts/setup_mm_packages.sh
$ export XDG_DOWNLOAD_DIR=$HOME/Downloads
7-3: Download and copy Proprietary Drivers files (Run commands at downloaded files directory).
$ cp R-Car_Gen3_Series_Evaluation_Software_Package_* $XDG_DOWNLOAD_DIR/
$ chmod a+rw $XDG_DOWNLOAD_DIR/*.zip
3. Configure to target board and build.
1st step: Run the aglsetup.sh Script.
$ cd $AGL_TOP
When your board is AGL RefHW.
$ source meta-agl/scripts/aglsetup.sh -f -m h3ulcb -b build-ic-refhw agl-ic-container agl-refhw-h3
When your board is R- CarH3 Starter Kit with Kingfisher board.
$ source meta-agl/scripts/aglsetup.sh -f -m h3ulcb-kf -b build-ic-h3kf agl-ic-container
When your board is Raspberry Pi 4
$ source meta-agl/scripts/aglsetup.sh -f -m raspberrypi4 -b build-ic-rpi4 agl-ic-container
2nd step: Build target image.
In this time, you can build 1,2a and 3a. If you want to build 3b, please do extra step in next section.
When you choice integration type 1.
$ bitbake lxc-host-image-minimal
When you choice integration type 2a.
$ bitbake agl-cluster-demo-lxc-host
When you choice integration type 3a.
$ bitbake agl-instrument-cluster-container-demo
4. Extra step for type 3b build.
This extra step can select 4a or 4b. When you want to build AGL demo IVI container guest in myself, please select 4a work flow. When you want to create AGL IC container demo quicly, please select 4b work flow.
Typically 4a step require long build time about 6h. When you want to build AGL Ref HW/ SK+ Kinfgisher software, you can\'t select select 4b work flow that depend to Renesas propriety license limitation.
4a. Extra step for type 3b build myself.
1st step: Configure 2nd build tree.
We recommend to open new terminal to do this extra section.
$ export AGL_TOP=$HOME/AGL/master
$ cd $AGL_TOP
When your board is AGL RefHW.
$ source meta-agl/scripts/aglsetup.sh -f -m h3ulcb -b build-ivi-refhw agl-container-guest-demo agl-demo agl-refhw-h3
When your board is R- CarH3 Starter Kit with Kingfisher board.
$ source meta-agl/scripts/aglsetup.sh -f -m h3ulcb-kf -b build-ivi-h3kf agl-container-guest-demo agl-demo
When your board is Raspberry Pi 4
$ source meta-agl/scripts/aglsetup.sh -f -m raspberrypi4 -b build-ivi-rpi4 agl-container-guest-demo agl-demo
2nd step: Build target images.
Type 3b integration need to build 3 image, these image are agl-ivi-demo-platform, agl-ivi-demo-platform-flutter and agl-ivi-demo-platform-html5.
$ bitbake agl-ivi-demo-platform
$ bitbake agl-ivi-demo-platform-flutter
$ bitbake agl-ivi-demo-platform-html5
3rd step: Set deploy path of AGL IVI Demo to IC side config.
Type 3b integration refer to IVI pre build image. Please set IVI side deploy directory in ic side local.conf (or site.conf).
At $AGL_TOP/build-ic-XXXX/conf/local.conf
Add to
OUT_OF_TREE_CONTAINER_IMAGE_DEPLOY_DIR = "/path/to/deploy/"
ex. When your board is AGL RefHW and your home directory is "/home/user/".
OUT_OF_TREE_CONTAINER_IMAGE_DEPLOY_DIR = "/home/user/AGL/octopus/build-ivi-refhw/tmp/deploy"
ex. When your board is R- CarH3 Starter Kit with Kingfisher board and your home directory is "/home/user/".
OUT_OF_TREE_CONTAINER_IMAGE_DEPLOY_DIR = "/home/user/AGL/octopus/build-ivi-h3kf/tmp/deploy"
ex. When your board is Raspberry Pi 4 and your home directory is "/home/user/".
OUT_OF_TREE_CONTAINER_IMAGE_DEPLOY_DIR = "/home/user/AGL/octopus/build-ivi-rpi4/tmp/deploy"
4th step: Build all in one image (3b).
Back to terminal for ic build.
$ bitbake agl-instrument-cluster-container-demo
4b. Extra step for type 3b using pre build image.
The 4b can select Raspberry Pi 4 board only, this limitation depend to Renesas propriety license limitation.
1st step: Download stable prebuild image from AGL site.
Download IVI guest images from this link.
[Prebuild AGL Demo IVI container images for Raspberry Pi 4.]
Extract download tar.bz2 archive to any directory.
$ cd /path/to/directory/
$ tar xvJf /path/to/download/agl-demo-ivi-container-guest-raspberrypi4-64.tar.bz2
2nd step: Set deploy path of AGL IVI Demo to IC side config.
Set extracted directory using OUT_OF_TREE_CONTAINER_IMAGE_DEPLOY_DIR in local.conf (or site.conf).
OUT_OF_TREE_CONTAINER_IMAGE_DEPLOY_DIR="/path/to/directory/prebuild/"
3rd step: Build all in one image (3b).
Back to terminal for ic build.
$ bitbake agl-instrument-cluster-container-demo
5. Write image to SD card.
The 3a and 3b image is constructed by wic image, that include partition table and each partition data into one image file.
In default setting, that wic image is compressed xz. When that wic image write to SD card, you need to use xzcat ant dd command in build PC.
$ sudo bash -c "xzcat /path/to/image/directory/agl-instrument-cluster-container-demo-XXXXX.wic.xz | dd of=/dev/sdXXX bs=128M"
If you are missing to set SD card device "/dev/sdXXX", it cause SSD/HDD data break (only logical, not physical).
For example;
A /dev/sda is SSD for your PC. A /dev/sdb is SD card. You should use /dev/sdb, must not use /dev/sda.
When your PC has direct SD card interface not a use card reader, your SD card device is /dev/mmcblkX may be.
6. Power on.
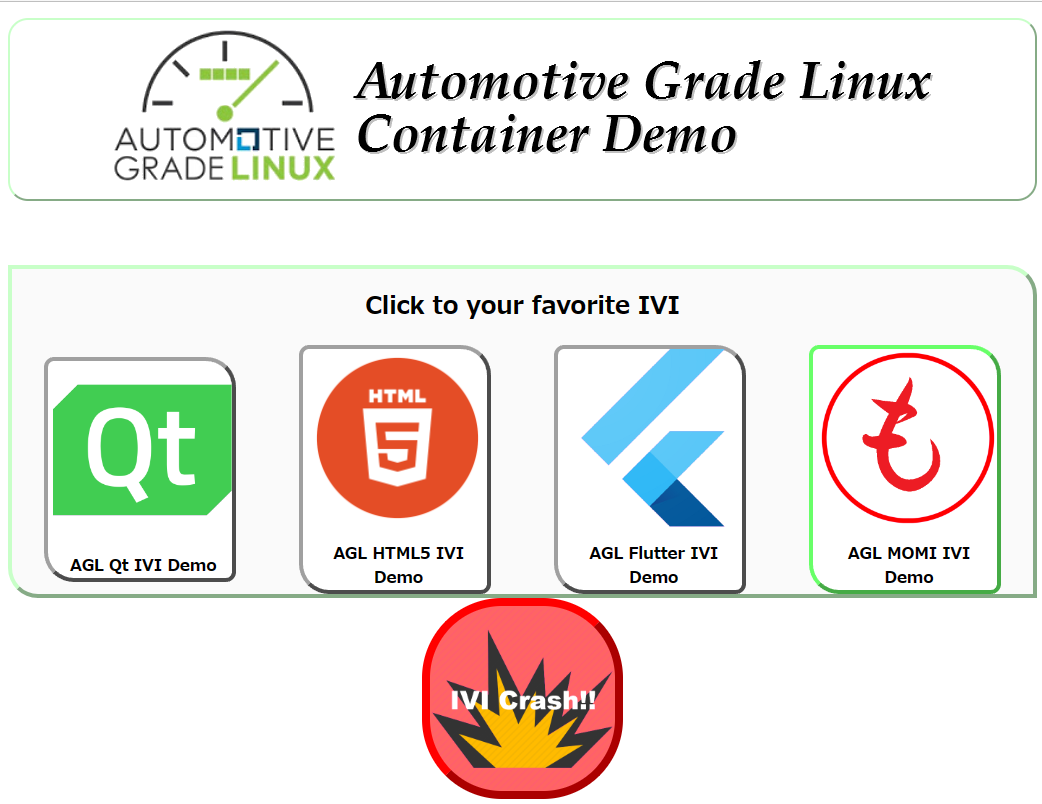
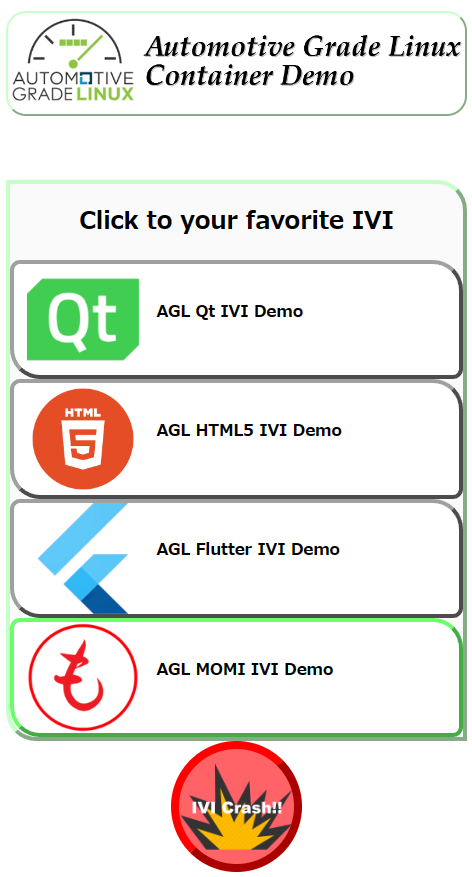
7. How to use container exchange UI.
7a. Momi Web
The Momi web is a web interface for container exchange. When you want to use Momi web, you must connect network between board and PC/Tablet/Phone.
The Momi web is completely demo feature, that open many security hole. You shall not use out of standalone demo.
1st step: Check IP address in your board.
After booting, you check IP address in your board.
root@raspberrypi4-64:\~# ifconfig\
eth0      Link encap:Ethernet  HWaddr E4:XX:YY:ZZ:WW:VV\
           inet addr:192.168.10.128  Bcast:192.168.10.255
  Mask:255.255.255.0
In this case, this board set IP address by 192.168.10.128.
2nd step: Connect to board using web browser.
Open "http://a.b.c.d:8080". When a board is set IP address 192.168.10.128, you open "http://192.168.10.128:8080".
When you success to connect to board, your web browser show these web UI.
PC View
Mobile View
7b. Keyboard Interface
Please refer to Appendix 3.
Appendix.1. Typical Hardware set.
AGL Reference Hardware.

| No | Name | num | Where to buy |
|---|---|---|---|
| 1 | AGL Ref HW | 1 | Ask to Panasonic. Contact about purchase |
| 2 | Touch Display (Full HD) | 1 | https://amzn.asia/d/7URb6r8 |
| 3 | Cluster Display (1920x720 or Full HD) | 1 | https://amzn.asia/d/bGircST |
| 4 | HDMI Cable (Need to check how to connect this cable to Touch/Cluster Display, that depend to display side connector) | 2 | https://amzn.asia/d/auuhnTK |
| 5 | Optional: Special Keyboard | 1 | https://amzn.asia/d/dZdbp9X |
Raspberry PI4
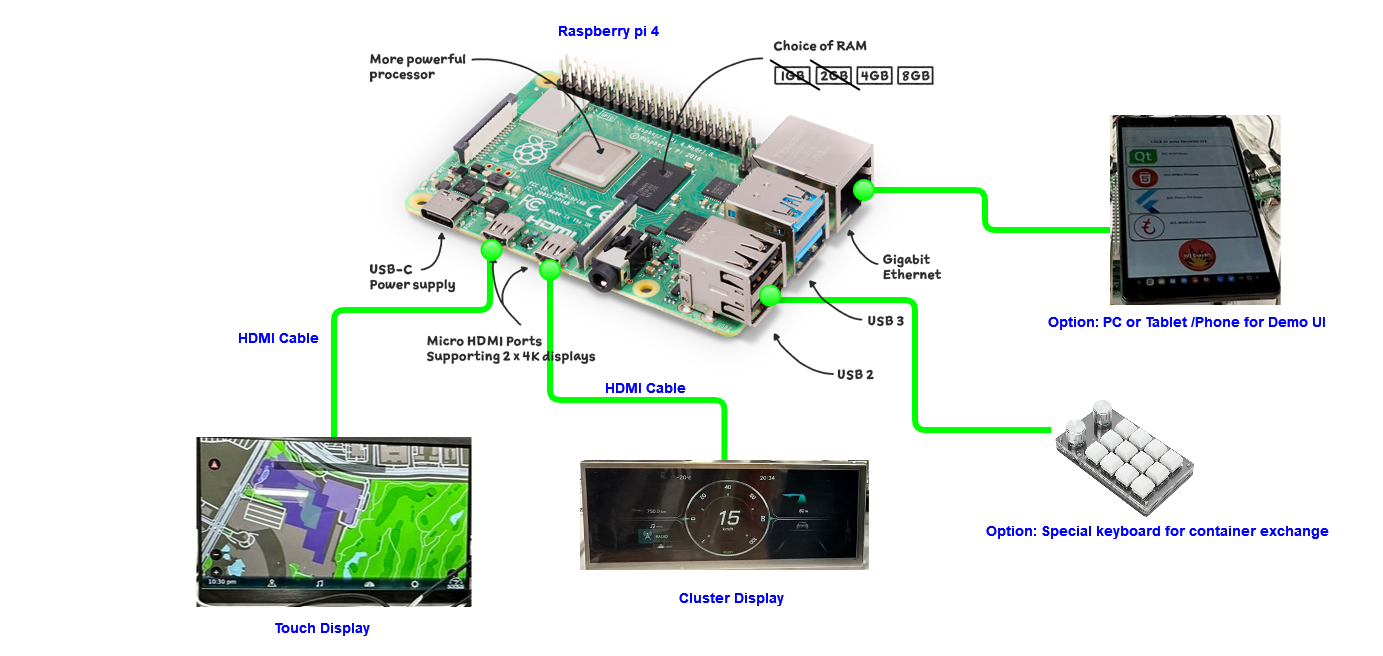
| No | Name | num | Where to buy |
|---|---|---|---|
| 1 | Raspberry PI 4(4G or 8G) with Power supply | 1 | https://akizukidenshi.com/catalog/g/gM-14778/ https://akizukidenshi.com/catalog/g/gM-16293/ |
| 2 | Touch Display (Full HD) | 1 | https://amzn.asia/d/7URb6r8 |
| 3 | Cluster Display (1920x720 or Full HD) | 1 | https://amzn.asia/d/bGircST |
| 4 | HDMI Cable (Need to check how to connect this cable to Touch/Cluster Display, that depend to display side connector) | 2 | https://akizukidenshi.com/catalog/g/gC-15002/ |
| 5 | Optional: Special Keyboard | 1 | https://amzn.asia/d/dZdbp9X |
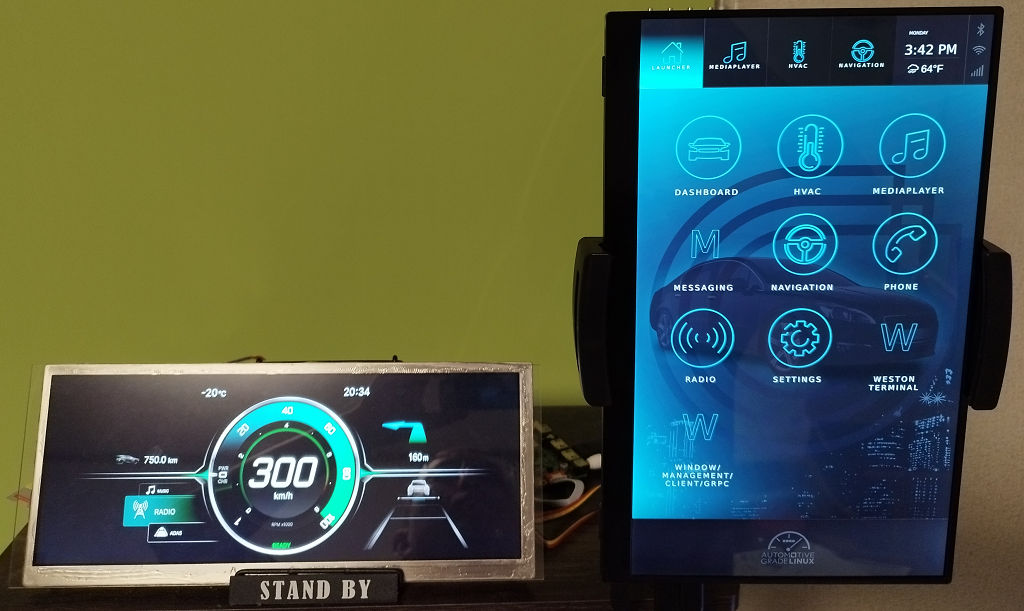
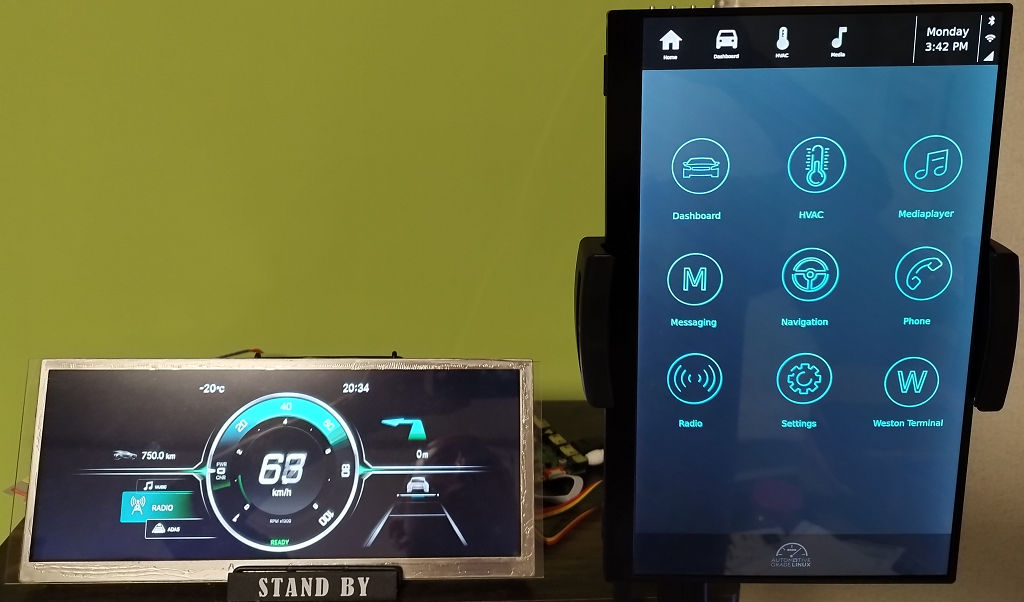
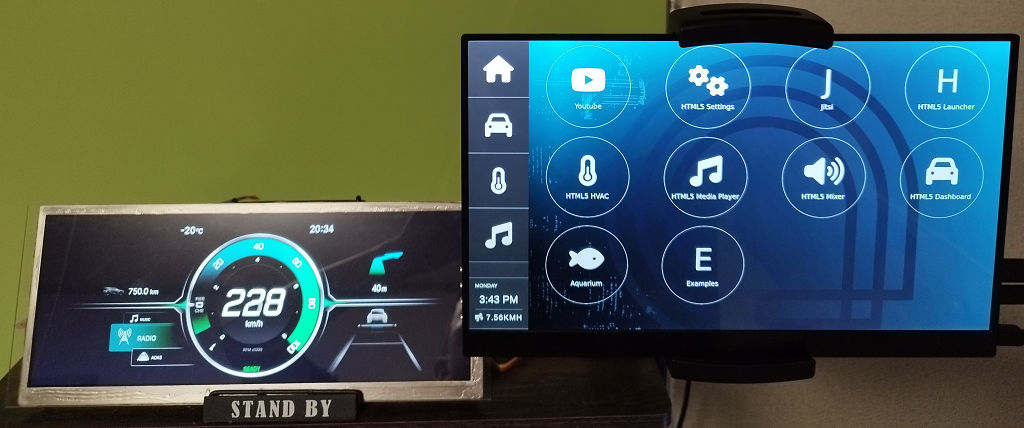
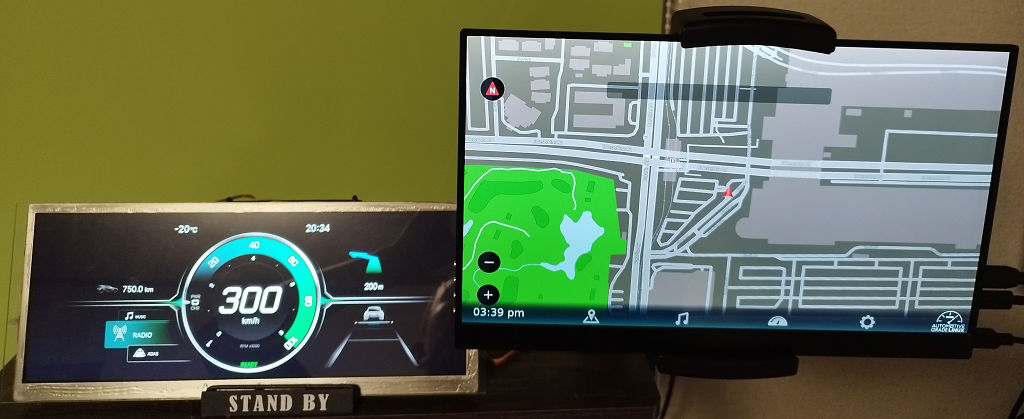
Appendix.2. Cluster with IVI Containers View.
Qt IVI
Flutter IVI
HTML5 IVI
Momi IVI
Appendix 3. How to configure Special Keyboard.
How to get configuration tool.
This description is targeting to this type of special keyboard.
The usb-12key-kbd-prog is unofficial community tool of this key board that is possible to use linux. Official windows tool is possible to get official site.
Usage of usb-12key-kbd-prog is please refer to upstream site.
Upstream: https://github.com/NeoCat/usb-12key-kbd-prog
Key Map.
| Key | Container |
|---|---|
| A | Momi IVI |
| C | Crash IVI guest |
| D | Qt IVI |
| G | Flutter IVI |
| H | HTML5 IVI |
Reference webpages
- eLinux
- Kingfisher Board
- R-Car M3SK
- agl reference machines
- AGL Tech Day Presenation
- Build AGL Image
- Building for Supported Renesas Boards