Unified HMI
Introduction
This document describes the design and usage of the Unified HMI, which is a common platform technology for UX innovation in integrated cockpit by flexible information display on multiple displays of various applications. Applications can be rendered to any display via a unified virtual display.
Remote Virtio GPU (RVGPU)
The RVGPU rendering engine, operating on a client-server model, creates 3D rendering commands on a client device and transmits them to a server device via the network, where the server-side device performs GPU-based rendering and displays the results. The meta-rvgpu currently supports x86, Raspberry Pi 4, and Renesas Boards platforms.
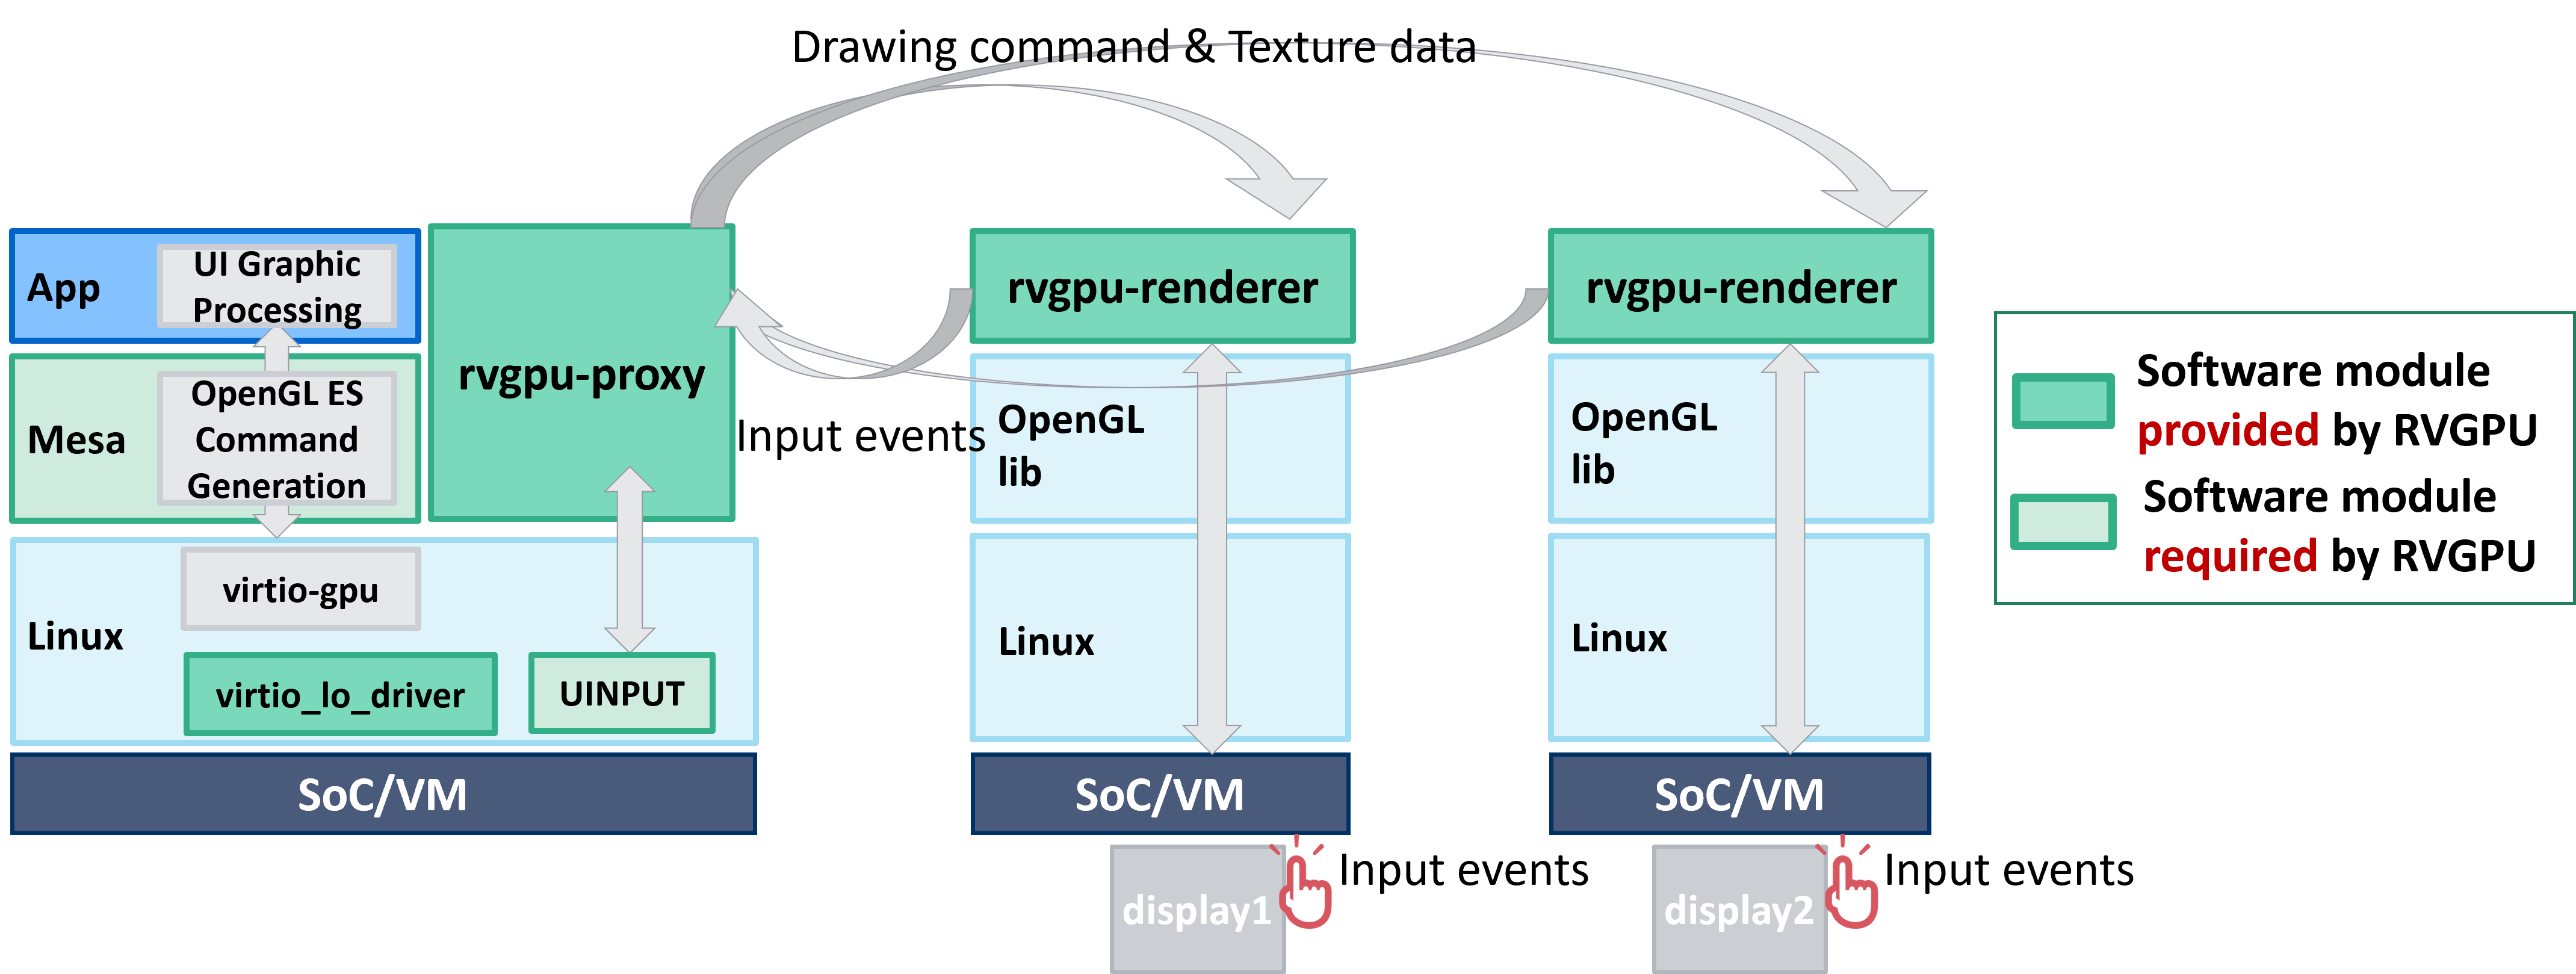
RVGPU Architecture
How to Build
Follow the AGL documentation for the build process, and set up the "Initializing Your Build Environment" section as described below to enable the AGL feature 'agl-rvgpu'. For example:
$ cd $AGL_TOP/master
$ source ./meta-agl/scripts/aglsetup.sh -m qemux86-64 -b qemux86-64 agl-demo agl-devel agl-rvgpu
$ bitbake <image_name>
<image_name> other than agl-demo-platform, create a file named <image_name>.bbappend in the directory
$AGL_TOP/master/meta-agl-devel/meta-uhmi/meta-rvgpu/recipes-platform/images
IMAGE_INSTALL:append = " packagegroup-rvgpu"
After making this change, you will need to execute the following commands:
$ cd $AGL_TOP/master
$ source agl-init-build-env
$ bitbake <image_name>
How to Setup and Boot
For Environment setup instructions for each platform, refer to the following link in the AGL Documentation.
Building for x86(Emulation and Hardware)
Building for Raspberry Pi 4
Building for Supported Renesas Boards
For Raspberry Pi 4 and Supported Renesas Boards, refer to the above URL for boot methods.
For x86 emulation (qemu), network bridge is required to enable communication with other devices when using RVGPU. Here’s an example procedure for your reference.
$ sudo ip link add <bridge_name> type bridge
$ sudo ip addr add <IP address> dev <bridge_name>
$ sudo ip link set dev <interface> master <bridge_name>
$ sudo ip link set dev <bridge_name> up
<bridge_name>: You can assign any name, for example: br0
- <IP_address>: Enter an available IP address, for example: 192.168.0.100/24
- <interface>: Specify the network interface, for example: eth0
To enable the use of the bridge, create or append /etc/qemu directory and /etc/qemu/bridge.conf file.
allow <bridge_name>
Create the following bash file named run_qemu_bridge.sh in any
<WORKDIR>.
#!/bin/bash

KERNEL_PATH=$1
DRIVE_PATH=$2
BRIDGE_NAME="<bridge_name>"

printf -v macaddr "52:54:%02x:%02x:%02x:%02x" $(( $RANDOM & 0xff)) $(( $RANDOM & 0xff )) $(( $RANDOM & 0xff)) $(( $RANDOM & 0xff ))

qemu-system-x86_64 -enable-kvm -m 2048 \
    -kernel ${KERNEL_PATH} \
    -drive file=${DRIVE_PATH},if=virtio,format=raw \
    -cpu kvm64 -cpu qemu64,+ssse3,+sse4.1,+sse4.2,+popcnt \
    -vga virtio -show-cursor \
    -device virtio-net-pci,netdev=net0,mac=$macaddr \
    -netdev bridge,br=$BRIDGE_NAME,id=net0 \
    -serial mon:stdio -serial null \
    -soundhw hda \
    -append 'root=/dev/vda rw console=ttyS0,115200n8 fstab=no'
sudo <WORKDIR>/run_qemu_bridge.sh <build_directory>/tmp/deploy/images/qemux86-64/bzImage <build_directory>/tmp/deploy/images/qemux86-64/agl-demo-platform-qemux86-64.ext4
ifconfig <your environment> 192.168.0.10 netmask 255.255.255.0
How to run RVGPU remotely
Prepare two images, one as the Sender and the other as the Receiver. It is necessary for the Sender and Receiver to be within the same network.
Receiver side
$ export XDG_RUNTIME_DIR=/run/user/<your_UID>
$ rvgpu-renderer -b <your_Area>@0,0 -p <Port_Number> &
Replace the placeholders with the appropriate values:
- <your_UID>: Specify according to your environment, for example:1001
- <your_Area>: Enter an usable area for example: 1080x1488
With the following command, you can know the usable area.
$ journalctl | grep -i "usable area"
# Example Output:
Nov 29 11:42:53 qemux86-64 agl-compositor[259]: [11:42:53.166] Usable area: 1080x1488+0,216
<Port_Number>: Enter an available port number, for example: 55555
Sender side
Create the following shell script run_remote_app.sh in any <WORKDIR> for a smooth experience.
#!/bin/bash

export XDG_RUNTIME_DIR=/tmp
export LD_LIBRARY_PATH=/usr/lib/mesa-virtio

# -------------
# launch app
# -------------
$@
Save the file and run the following to start weston.
$ rvgpu-proxy -s 1080x1488@0,0 -n <IP_address_of_Receiver>:<Port_Number> &
$ <WORKDIR>/run_remote_app.sh weston --backend drm-backend.so -Swayland-0 --seat=seat_virtual -i 0 &
<Port_Number>: Port set in the renderer.
After completing these steps, the Weston screen from the Sender will be transferred and displayed on the Receiver using rvgpu-proxy and rvgpu-renderer. You can verify that everything is functioning properly by launching wayland applications on the Sender side, such as:
$ weston-simple-egl -f
You can also verify the touch or keyboard operation support of the RVGPU by using app such as
$ weston-smoke
$ weston-editor
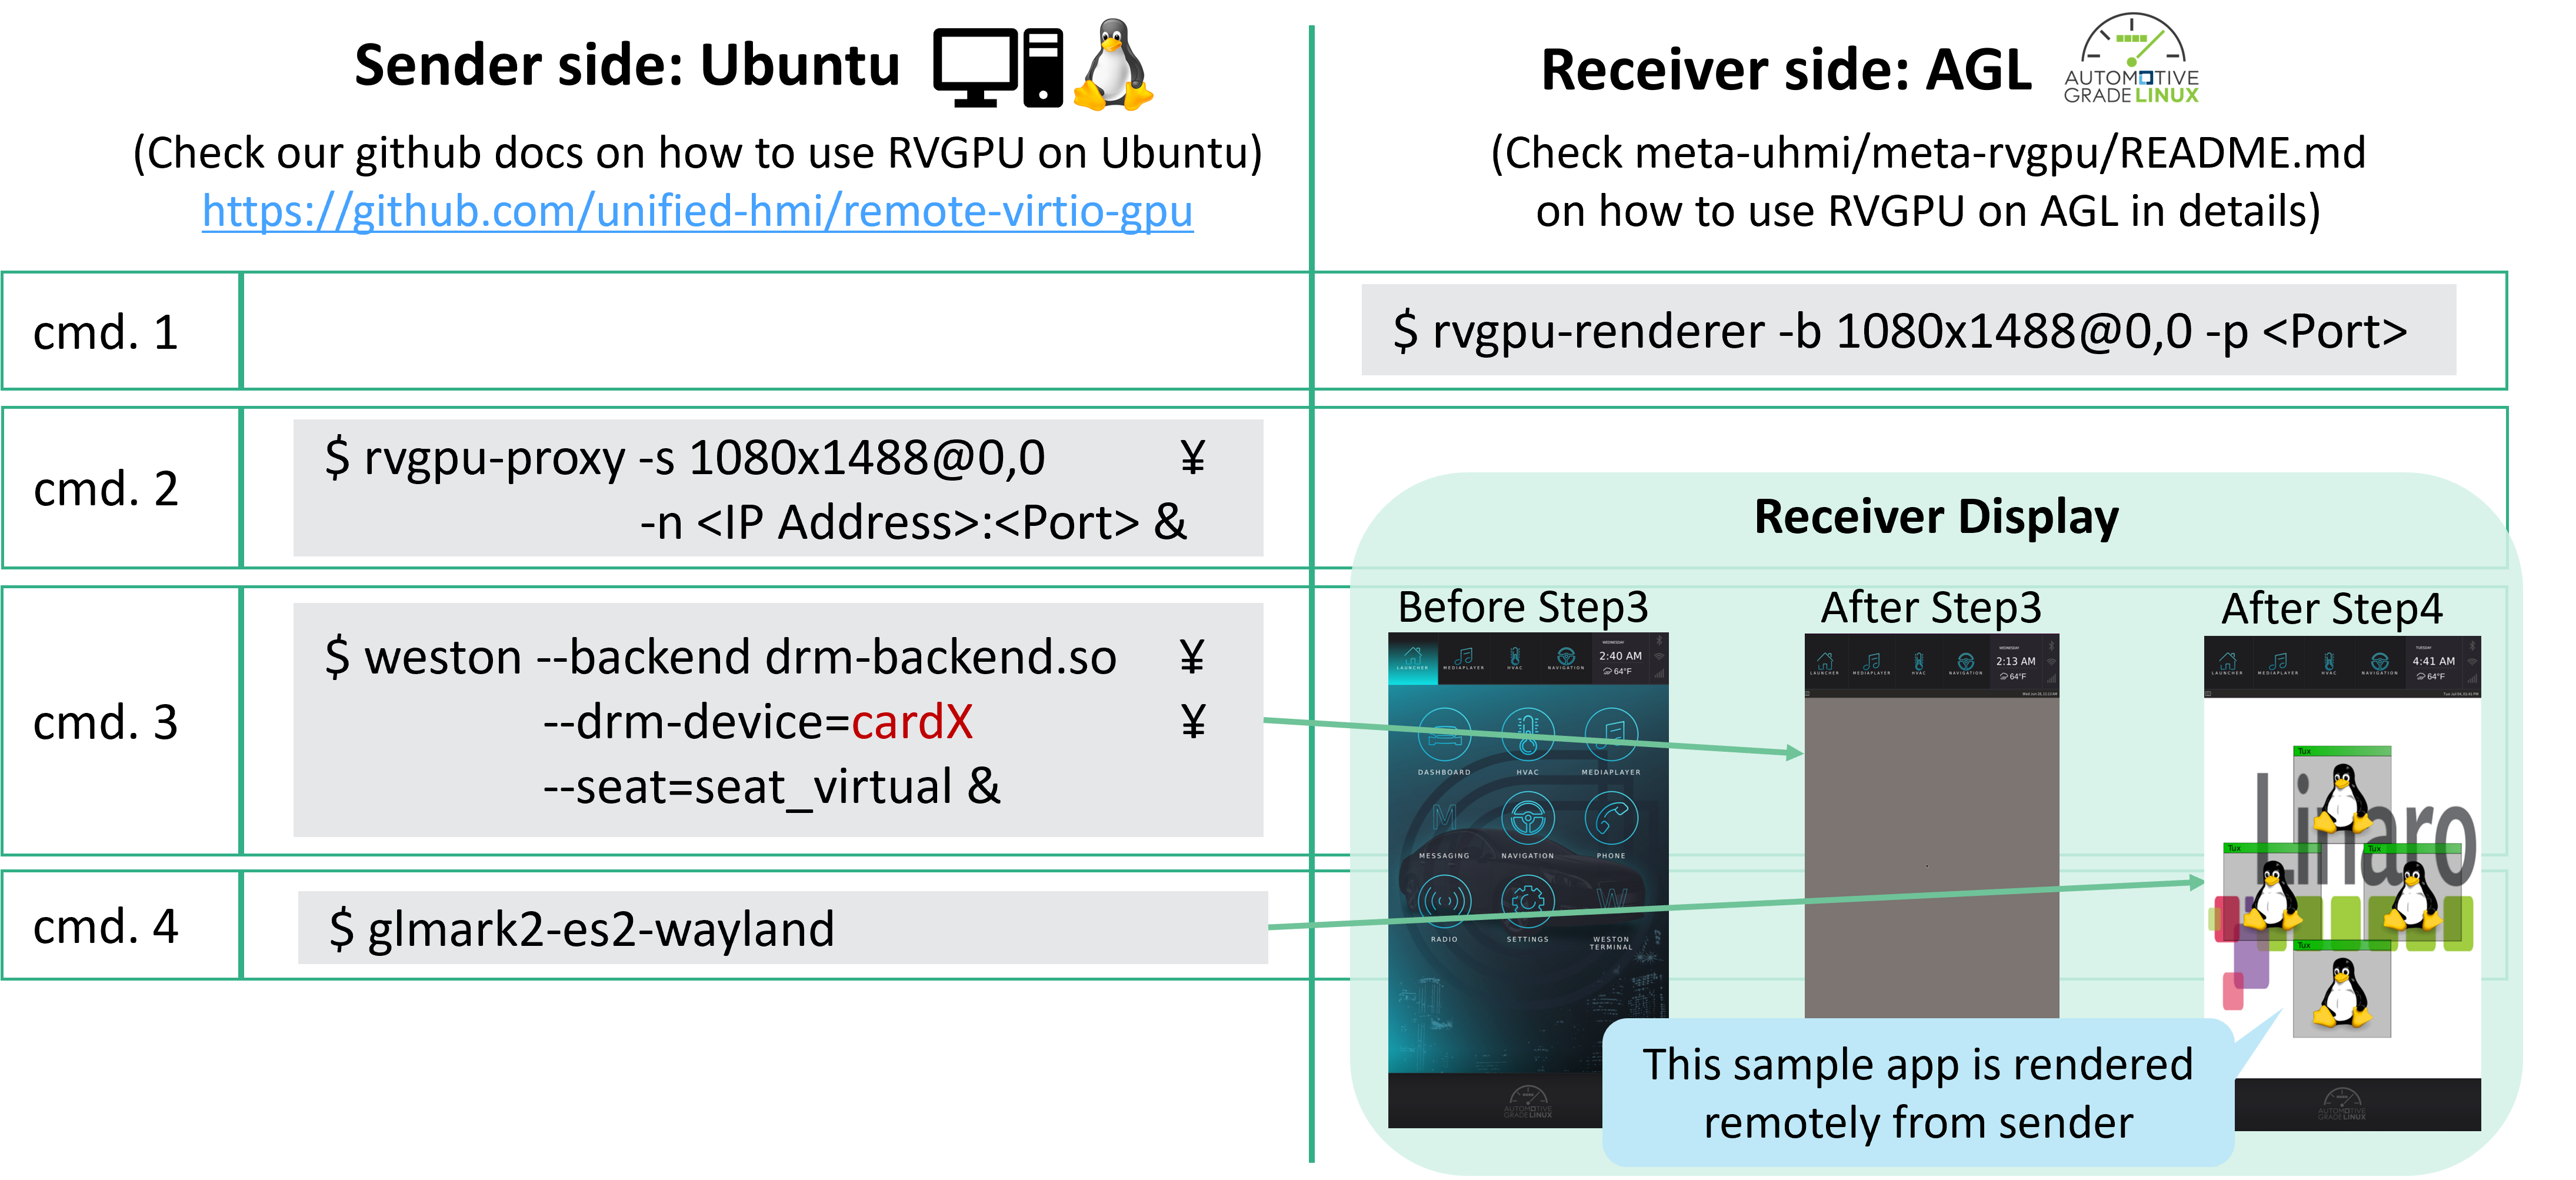
Appendix
- By building the RVGPU on Ubuntu, it is possible to enable bidirectional remote rendering between the agl-demo-platform and Ubuntu.
For the build procedure on Ubuntu, see the following URL: https://github.com/unified-hmi/remote-virtio-gpu
The figure below shows an example where Ubuntu is used as the Sender and AGL as the Receiver, running RVGPU.